|
||||
|
Home |Stuck Jct |About Us |Products and Services |Contact Us |
||||
|
Switch List Articles Community E-Books Coming
Soon! Gallery Coming
Soon! More Information? |
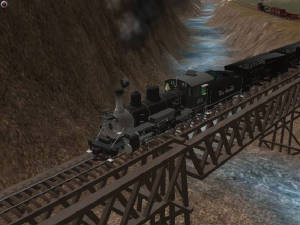
The Train Sim Photographer The Artist’s Mirror By Alfred Barten Originally published in Woodbridge's Train Simulation Craftsman Volume 2, Issue Number 3, Third Quarter 2003. --Ed Long ago artists discovered a convenient way to get a fresh look at their work was to view it in a mirror. The reversal of the image cast away the familiar view, the one they had probably become too enamored with. We can do something similar by taking screenshots of the routes and rolling stock we are working on. Though it’s possible with some paint programs to reverse the image, this usually isn’t necessary. The screenshot already changes the way we look at the object because it produces a still image of something we usually view in motion. The still shot gives us a chance to look carefully and critically at what previously we only saw in passing. There isn’t any great secret to the process. Just hit the Prnt Scrn key. MSTS stores the images as PCX files in the Microsoft Games | Train Simulator folder; Trainz stores the images as TAR files in the Trainz | Screenshots folder. In both cases I usually convert the images to BMPs, which are more universally readable by paint programs, and then to JPG for final use on the web or in a Word document. I keep the original format, or at least the BMP format, files because they can be manipulated without degradation. Manipulating JPG files is likely to produce degradation each time you resave. I use Irfanview (see http://www.irfanview.com/) for batch conversion to save time. For this article I used a Trainz route I am working on. In the first shot I spotted the falloff of the ground just beyond the end of the siding at the right. This is not what I had in mind. I also spotted some of the background hills in the upper left had sharper corners than I would like.
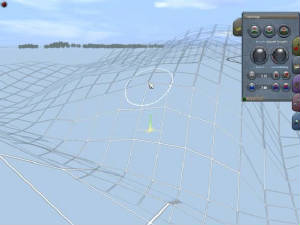
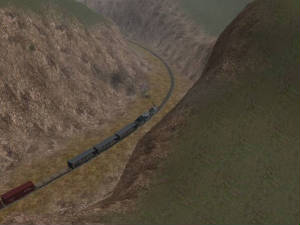
In the next shot I also found ground level problems. The ground along the track ahead is up a little high in one spot and the embankment at the right has some sharper points than I would like. Fixing the roadbed is pretty easy in Surveyor. I find switching to the skeleton view is the best way to fix the points in the terrain. It took me awhile to realize this view was available. You can get it at the menu bar that is normally hidden at the top of the screen. Just slide the cursor up to the top of the screen to reveal the menu bar. Look for the icon on the right that looks like a pound sign. Click the icon to toggle the skeleton/normal view. When using the skeleton view I find I can manipulate the vertices (intersections) of the grid one at a time if I select the icon in the upper right of the tool palette and turn the left-hand dial down to zero. If this is unresponsive, zoom in a little with the Page Up key. Sometimes you have to look at a curve from several viewpoints to see where the jagged corner is.
|
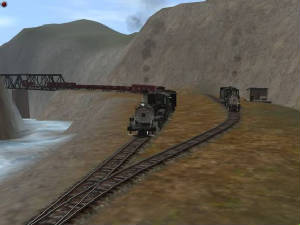
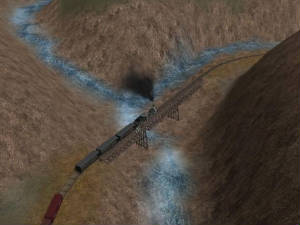
The shot below pointed out the poorly placed trestle at the near end. At one time this had been properly placed, but through my various manipulations of the grades in this area the positioning became bad without my being aware of it. Also, the water below is now flooding the far trestle support, something I don’t want. Both of these conditions are easily fixed by adjusting the ground.
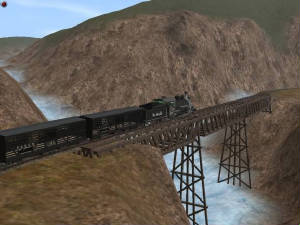
In the next shot I found pasty-colored streaks in the background along the river (the reproduction here doesn’t reveal these streaks as much as direct viewing in the simulation does). The streaks appeared after I switched from WinMe to WinXP and found OpenGL would no longer work. Switching to DirectX revealed these streaks. At first I thought it was the jaggedness in my terrain. I spent a lot of time smoothing out my rock formations –- even though I had originally made them jagged. Finally I discovered the real solution was to turn on Shadows in Trainz Configuration. I had previously turned it off because not all rolling stock casts shadows. The locomotive in these shots, for example, does not cast shadows.
The following shots are a couple of “keepers.” I went ahead and removed the telltale red light from the upper left corner and removed the white cursor tip in the lower right corner. I used MS Paint for the modifications.
Articles and screenshots ©2003 Alfred Barten. All rights reserved.
|
||
|
This web site is made
possible through your generous support. Thank you! |
||||